Apps Scriptリファレンス: Apps Script Reference |障害・課題追跡: IssueTracker |Google Workspace: Status Dashboard - Summary

ラベル HTML Service の投稿を表示しています。 すべての投稿を表示

2024年6月10日月曜日

Google SlidesのダイアログにSpreadsheetの値を読み込みたい(datalist) - load the values from the Spreadsheet into a dialog in Google Slides.


Google Slidesのダイアログに配置したdatalistに、Spreadsheetの値を入れる機能を作ったときの備忘録です。
This is a memo for when I created a function to load values from a Spreadsheet into the options of a datalist placed in a dialog in Google Slides.


Procedures

SpreadsheetのA1〜A3にそれぞれ以下の値を入れておきます。
Enter the following values into cells A1 to A3 of the spreadsheet.
A1: option 1
A2: option 2
A3: option 3


Google SlidesのApps Scriptに以下のCode.gsを書きます。
Write the following code in Code.gs in Google Slides Apps Script.


SPREADSHEET_IDは読み込ませたい値が入ったシートのIDに置き換えます。
Replace SPREADSHEET_ID with the ID of the sheet containing the values you want to load.


modalessTemplate() を実行すると、ダイアログに配置したデータリストにシートの値が読み込まれます。
Execute the modalessTemplate() to load those data into a data list placed in a dialog in Google Slides.


リストにない option 4 を入力してsubmitをクリックします。
Enter option 4, which is not in the list, and click submit.


シートに option 4 が追加されます。
Option 4 will be added to the sheet.


ダイアログリストにも option 4 が追加されます。
The option 4 will also be added to the list in the dialog.


Apps Script


Code.gs
const ssUrl = "https://docs.google.com/spreadsheets/d/SPREADSHEET_ID/edit#gid=0";

function modalessTemplate() {
const htmlOutput = HtmlService
.createTemplateFromFile("index")
.evaluate()
.setWidth(360)
.setHeight(240);
SlidesApp.getUi().showModelessDialog(htmlOutput, "MyGUI");
}

function returnList() {
const sheet = SpreadsheetApp.openByUrl(ssUrl).getSheets()[0];
const values = sheet.getDataRange().getValues();
const list = values.flat();
return list;
}

function setNewValue(newValue) {
const sheet = SpreadsheetApp.openByUrl(ssUrl).getSheets()[0];
const lastRow = sheet.getLastRow();
const data = sheet.getRange("A1:A" + lastRow).getValues();
for (let i = 0; i < data.length; i++) {
if (data[i][0] == newValue) {
return "failure: value already exists";
}
}
sheet.getRange("A" + (lastRow + 1)).setValue(newValue);
return "success";
}


index.html
<!DOCTYPE html>
<html>
<head>
<base target="_top">
</head>
<body>
<input type="text" id="tb" list="sheetValues">
<button id="submit">submit</button>
<datalist id="sheetValues"></datalist>

<script>
function elem(id) {
return document.getElementById(id);
}

function onFailure(e) {
alert([e.message, e.stack]);
}

elem("submit").addEventListener("click", submitClicked);

getList();
function getList() {
google.script.run
.withFailureHandler(onFailure)
.withSuccessHandler(createDatalist)
.returnList();
}

function createDatalist(list) {
const datalist = elem("sheetValues");
console.log(list)
for(let i = 0; i < list.length; i++) {
const option = document.createElement("option");
option.textContent = list[i];
datalist.appendChild(option);
}
}

function submitClicked() {
const newValue = elem("tb").value;
google.script.run
.withFailureHandler(onFailure)
.withSuccessHandler(successSetNewValue)
.withUserObject(newValue)
.setNewValue(newValue);
}

function successSetNewValue(message, newValue) {
console.log(message);
if(message === "success") {
const datalist = elem("sheetValues");
const option = document.createElement("option");
option.textContent = newValue;
datalist.appendChild(option);
}
}
</script>
</body>
</html>


Reference

シートのデータをdatalistに読み込みたい

スプレッドシートのurlとnameをHTMLServiceでセレクトボックスのオプションに保存したい

2024年5月30日木曜日

Shiftキーの有無で処理が変わるボタンを作りたい - Create buttons affected by the Shift key


Google Apps ScriptのHTML Serviceで、e.shiftKey のtrue / false を判定し、ボタンの処理を分岐する仕組みを作ったときに書いたコードです。
I tried code in Google Apps Script's HTML Service to check whether e.shiftKey is true or false and handle the button's actions accordingly.

Demo


下記のApps ScriptをデプロイしてWebアプリを起動すると、テキストエリアが横に2つ、左下にsubmitボタンが表示されます。
After launching the deployed web app, two text areas will be displayed side by side, with a submit button in the lower left corner.


左のinputテキストエリアに任意の英文を入力します。
Input any English text into the left text area.


submitボタンをクリックすると、その下に英文内の単語がボタンに分かれて表示されます。
After clicking the submit button, the words from the English text will be displayed as individual buttons below it.


単語のボタンをクリックすると、ボタンがハイライトされて右のテキストエリアにその単語が入力されます。
After clicking a word button, the button will be highlighted, and the word will be input into the right text area.


Shiftキーを押しながらボタンをクリックすると、その単語が右のテキストエリアに入力されます。
The words clicked while holding the Shift key will be input into the right text area.


Shiftキーを押さずに別の単語ボタンをクリックすると、ハイライトと右のテキストエリアがクリアされ、クリックした単語が入力されます
Clicking another word button without Shift clears the highlight and the right text area, then inputs the clicked word.


Apps Script

Code.gs
function doGet() {
return HtmlService.createTemplateFromFile('index')
.evaluate()
.setTitle("Title");
}

function include(filename) {
return HtmlService.createHtmlOutputFromFile(filename).getContent();
}


index.html
<!DOCTYPE html>
<html>
<head>
<?!= include("css"); ?>
</head>
<body>
<textarea id="input"></textarea>
<textarea id="result"></textarea>
<br>
<button id="submit">submit</button>
<br>
<div id="wordButtons"></div>
<?!= include("javascript"); ?>
</body>
</html>


css.html
<style>
textarea {
width: 30vw;
height: 20vh;
font-size: 20px;
}

.wordButtons {
font-size: 18px;
background-color: white;
border: solid 1px gray;
border-radius: 2px;
margin: 5px;
padding: 5px;
cursor: pointer;
}

.buttonHighlight {
background-color: aqua;
}
</style>


javascript.html
<script>
function elem(id) {
return document.getElementById(id);
}

elem("submit").onclick = createButtonsClicked;

function createButtonsClicked() {
const value = elem("input").value.trim();
const records = value.split("\n");
for(let i = 0; i < records.length; i++) {
const record = records[i].trim();
const words = record.split(" ");
createWordButtons(words);
}
}

function createWordButtons(words) {
const parent = elem("wordButtons");
const span = document.createElement("span");
const br = document.createElement("br");
for(let i = 0; i < words.length; i++) {
const word = words[i].match(/[a-zA-Z0-9'\s-]/g, "").join("");
const button = document.createElement("button");
button.textContent = word;
button.setAttribute("class", "wordButtons");
button.onclick = function(e){ wordButtonClicked(e, this)}
span.appendChild(button);
}
span.setAttribute("data-words", words.join(" "));
parent.appendChild(span);
parent.appendChild(br);
}

function wordButtonClicked(e, button) {
button.classList.add("buttonHighlight");
if(e.shiftKey) {
elem("result").value = elem("result").value + " " + button.textContent;
} else {
elem("result").value = button.textContent;
clearHighlight();
button.classList.add("buttonHighlight");
}
}

function clearHighlight() {
const parent = elem("wordButtons");
const buttons = parent.getElementsByTagName("button");
for(let i = 0; i < buttons.length; i++) {
buttons[i].classList.remove("buttonHighlight");
}
}
</script>


Reference

KeyboardEvent: shiftKey プロパティ

2023年9月24日日曜日

New line removal App using Google Apps Script


Introduction

This is a simple application for removing new lines from the input textarea to the output textarea.


Application

After typing in the input text area, if you click on the output text area, the text will be input with line breaks removed.

Sample App


Source Code


Code.gs
function doGet() {
return HtmlService.createTemplateFromFile('index')
.evaluate()
.setTitle("Title");
}

function include(filename) {
return HtmlService.createHtmlOutputFromFile(filename).getContent();
}

index.html
<!DOCTYPE html>
<html>
<head>
<?!= include("css"); ?>
</head>
<body>
<textarea id="input"></textarea>
<br>
<textarea id="output"></textarea>
<?!= include("javascript"); ?>
</body>
</html>

css.html
<style>
textarea {
width: 90vw;
height: 40vh;
}
</style>

javascript.html
<script>
function elem(id) {
return document.getElementById(id);
}

elem("input").onchange = inputChanged;

function inputChanged() {
elem("output").value = elem("input").value.replace(/\n/g, "");
}
</script>


2023年9月23日土曜日

Creating a template copier app in Google Apps Script


Introduction

This article will show you a template copier application in Google Apps Script. 
This application will automatically copy a template to your MyDrive when you access the deployed URL.

This is useful for anyone who wants to save time and effort when developing web applications with HTMLService.


Application

When you access the deployed URL, the "OPEN FILE" link will be displayed on the screen.


The application Code1.gs is deployed as a web application. 
When you access the URL, the Template file, which includes Code2.gs, index.html, css.html and javascript.html are copied. 
A link to the file is displayed in the browser. 
Clicking the link opens the file that copied the Template.


Source Code


This code is for an application that is deployed to copy templates.


Code1.gs
const FILE_ID = "FILE_ID";

function doGet() {
const copyFileUrl = copyFileToMydrive();
const html = '<a target="_blank" href="' + copyFileUrl + '">OPEN FILE</a>';
return HtmlService.createHtmlOutput(html);
}

function copyFileToMydrive() {
const file = DriveApp.getFileById(FILE_ID);
const name = "Copy of " + file.getName();
const copyFile = file.makeCopy(name);
return copyFile.getUrl();
}


As a template to copy from, we will prepare the following code. 
The contents of the code are up to you. 
The following is just one example, so please feel free to write it as you like.

Template:

Code2.gs
function doGet() {
return HtmlService.createTemplateFromFile('index')
.evaluate()
.setTitle("Title");
}

function include(filename) {
return HtmlService.createHtmlOutputFromFile(filename).getContent();
}

function returnHello(name) {
return "Hello" + " " + name;
}


index.html
<!DOCTYPE html>
<html>
<head>
<?!= include("css"); ?>
</head>
<body>
<input type="text" id="name">
<button id="bt">submit</button>
<?!= include("javascript"); ?>
</body>
</html>

css.html
<style>
#name {
width: 10vw;
height: 5vh;
font-size: 20px;
}
</style>

javascript.html
<script>
document.getElementById("bt").onclick = runHello;

function runHello() {
var name = document.getElementById("name").value;
google.script.run
.withFailureHandler(onFailure)
.withSuccessHandler(onSuccess)
.withUserObject("how are you?")
.returnHello(name);
}

function onSuccess(result, userObject) {
alert(result + " " + userObject);
}

function onFailure(e) {
alert([e.message, e.stack]);
}
</script>


This template app is as follows:


Tips

By changing the FILE_ID in Code1.gs, you can copy any file in Google Drive, such as scripts, spreadsheets, or documents.


Reference

Class File > makeCopy() Method

2023年9月22日金曜日

Trying Google Translate with Google Apps Script


Introduction

We will create a simple English to Japanese translator using Google Apps Script. 
The application will have a front-end input form and a back-end server that will process the translation results.


Application

We need to create a front-end form that will allow users to enter the English text they want to translate. 


When you enter English that you want to translate to Japanese and click the button, the English is passed to the server side, and the translated Japanese is returned to the front end using LanguageApp.translate.


Source Code

Code.gs
function doGet() {
return HtmlService.createHtmlOutputFromFile('index').setTitle("Title");
}

function returnJapanese(value) {
return LanguageApp.translate(value, "en", "ja");
}


index.html
<!DOCTYPE html>
<html>
<body>
<textarea id="text"></textarea>
<button id="submit">Translate to Japanese</button>
<script>
document.getElementById("submit").onclick = runTranslate;

function runTranslate() {
var value = document.getElementById("text").value;
google.script.run
.withFailureHandler(onFailure)
.withSuccessHandler(onSuccess)
.returnJapanese(value);
}

function onSuccess(result) {
alert(result);
}

function onFailure(e) {
alert([e.message, e.stack]);
}
</script>
</body>
</html>


Tips

LanguageApp.translate(text, sourceLanguage, targetLanguage)

If source language is empty, it will be auto-detected.


Reference

Class LanguageApp
https://developers.google.com/apps-script/reference/language/language-app

Language support
https://cloud.google.com/translate/docs/languages


English
Take your time.


Japanese
ゆっくりしてください。


2023年9月21日木曜日

A simple application using google.script.run


Introduction

I will introduce a simple application that uses Google Apps Script and google.script.run to display a message with the user's name. 

The application places a text box and a button on the screen. 
When the button is clicked, the name entered in the text box is passed to a server-side Apps Script function, which returns a message with the user's name. 
The message is then displayed on the screen.

I will also explain how to use the google.script.run API to call server-side Apps Script functions from client-side JavaScript. 
The google.script.run API allows you to pass arguments to the server-side functions and to receive results back from them.


Application

A text box and a button on the screen


Enter your name and click the button, a message will be displayed on the screen.


Source Code

Code.gs
function doGet() {
return HtmlService.createHtmlOutputFromFile('index').setTitle("Title");
}

function returnHello(name) {
return "Hello" + " " + name;
}


index.html
<!DOCTYPE html>
<html>
<body>
<input type="text" id="name">
<button id="bt">submit</button>
<script>
document.getElementById("bt").onclick = runHello;

function runHello() {
var name = document.getElementById("name").value;
google.script.run
.withFailureHandler(onFailure)
.withSuccessHandler(onSuccess)
.withUserObject("how are you?")
.returnHello(name);
}

function onSuccess(result, userObject) {
alert(result + " " + userObject);
}

function onFailure(e) {
alert([e.message, e.stack]);
}
</script>
</body>
</html>


Tips

google.script.run
call server-side Apps Script functions(in Code.gs)

.withFailureHandler(function)
a callback function to run if the server-side function throws an exception

.withSuccessHandler(function)
a callback function to run if the server-side function returns successfully

.withUserObject(object)
a second parameter to the success and failure handlers
        
.returnHello(name)
run a function in Code.gs


Reference

Class google.script.run (Client-side API)

2023年9月20日水曜日

Creating HTML with Google Apps Script(createHtmlOutputFromFile)


This is an example of code that creates a simple HTML page with Google Apps Script's HtmlService.createHtmlOutputFromFile().


The output HTML page will be as follows.


The script editor will look like this:


Code.gs
function doGet() {
return HtmlService.createHtmlOutputFromFile('index').setTitle("Title");
}


index.html
<!DOCTYPE html>
<html>
<head>
<style>
textarea {
width: 80vw;
height: 80vh;
font-size: 15px;
}
</style>
</head>
<body>
<textarea></textarea>
<script>
myFunction();
function myFunction() {
console.log("This is a log message.");
}
</script>
</body>
</html>


Reference

HTML Service: Create and Serve HTML


Related pages

2023年9月19日火曜日

Creating HTML with Google Apps Script(createTemplateFromFile)

This is an example of code that creates a simple HTML page with Google Apps Script's HtmlService.createTemplateFromFile().

HtmlService.createTemplateFromFile() allows you to manage CSS and JavaScript files separately from index.html.

The output HTML page will be as follows.


The script editor will look like this:

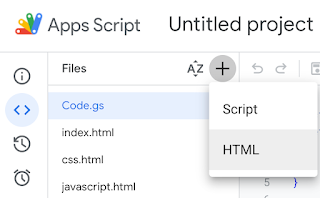
We can create a .html file by clicking the Plus icon to the right of Files and selecting HTML.


Code.gs
function doGet() {
return HtmlService.createTemplateFromFile('index')
.evaluate()
.setTitle("Title");
}

function include(filename) {
return HtmlService.createHtmlOutputFromFile(filename).getContent();
}


index.html
<!DOCTYPE html>
<html>
<head>
<?!= include('css'); ?>
</head>
<body>
<textarea></textarea>
<?!= include('javascript'); ?>
</body>
</html>


css.html
<style>
textarea {
width: 80vw;
height: 80vh;
font-size: 15px;
}
</style>


javascript.html
<script>
myFunction();
function myFunction() {
console.log("This is a log message.");
}
</script>


Related pages

Latest post

Google Formsでクイズを作りたい

Googleフォームには回答を判定するクイズモードがあります 今回はそのクイズモードで回答の判定とフィードバックについて書いていきます 「クイズモード」の表記: 日本語の表記は「テストにする」ですが 英語の表記は「Make this a quiz」となっています この記事ではそれ...